Account Help
How to set up an account
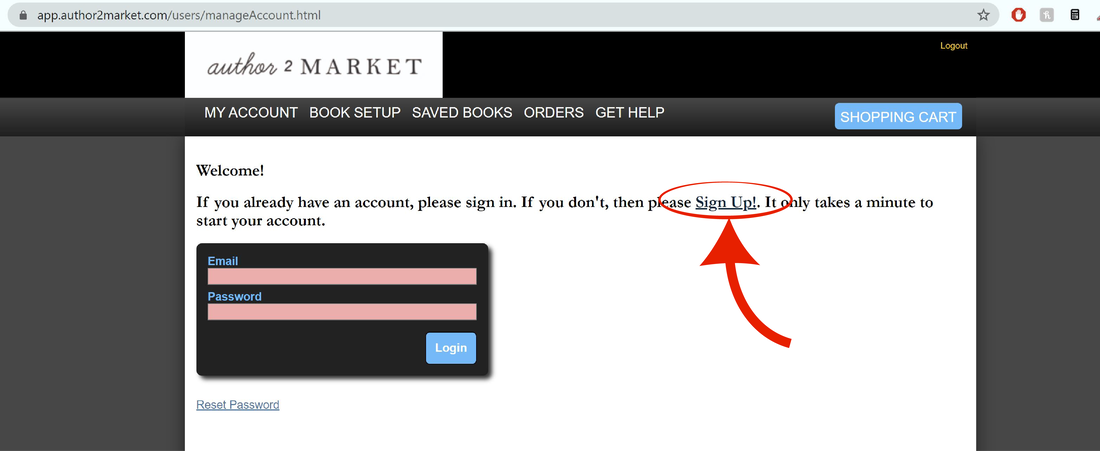
Don't have an account with us yet? Setting up a new account is fast and easy! From the login page, select "Sign Up!".
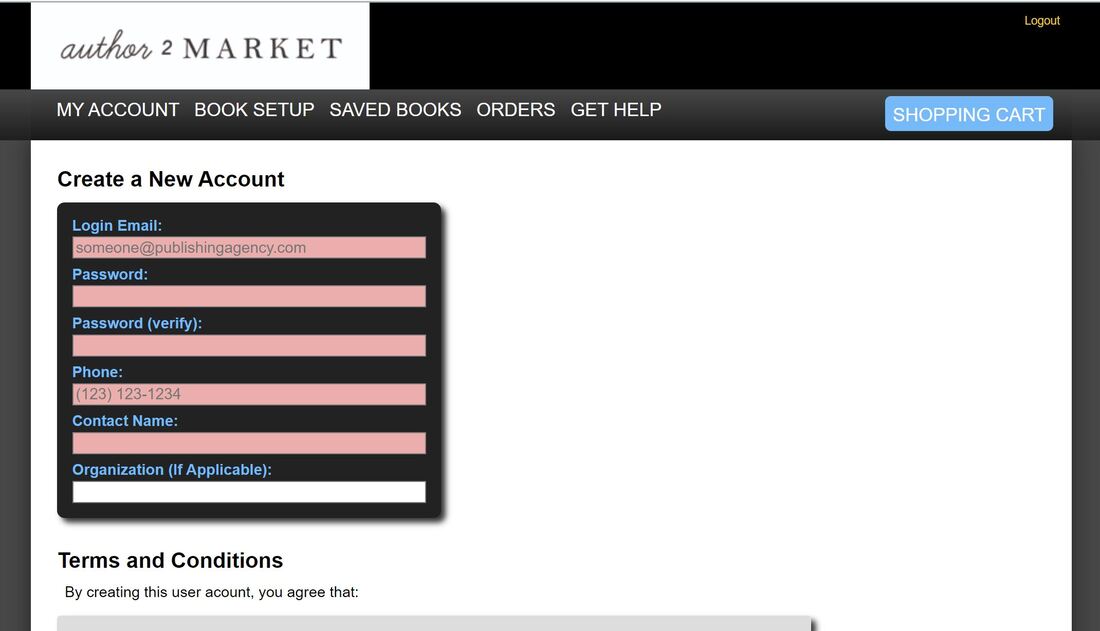
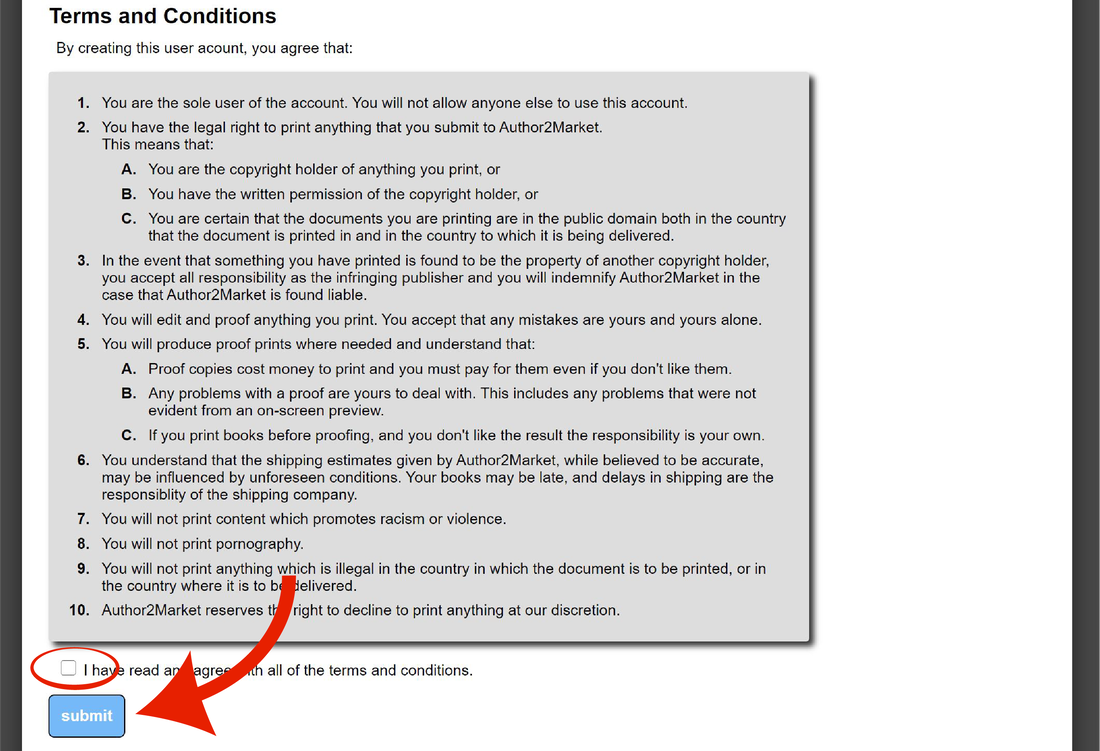
Fill out the correct information, then check the box for Terms and Conditions, and hit the submit button.
Congratulations! You have set up your new account. Return to the homepage to log in and start creating.
TROUBLE LOGGING IN
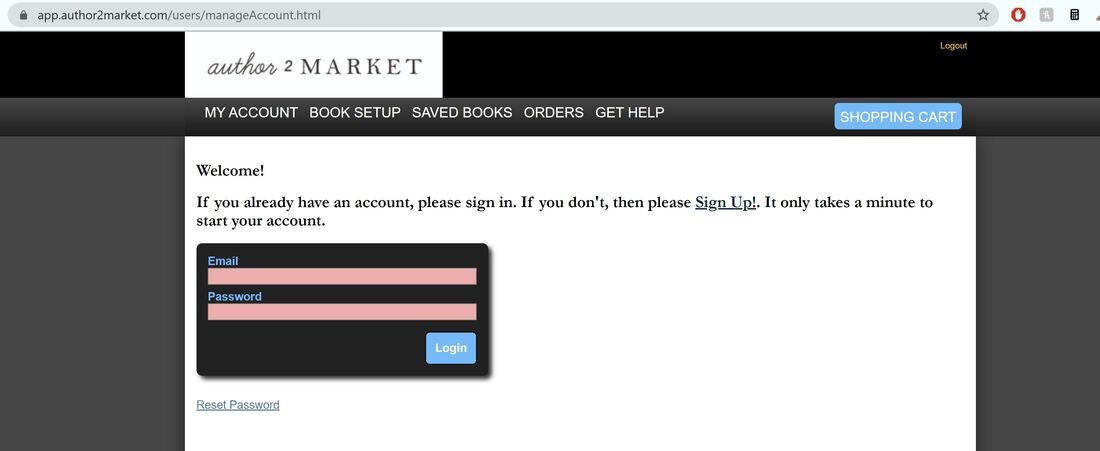
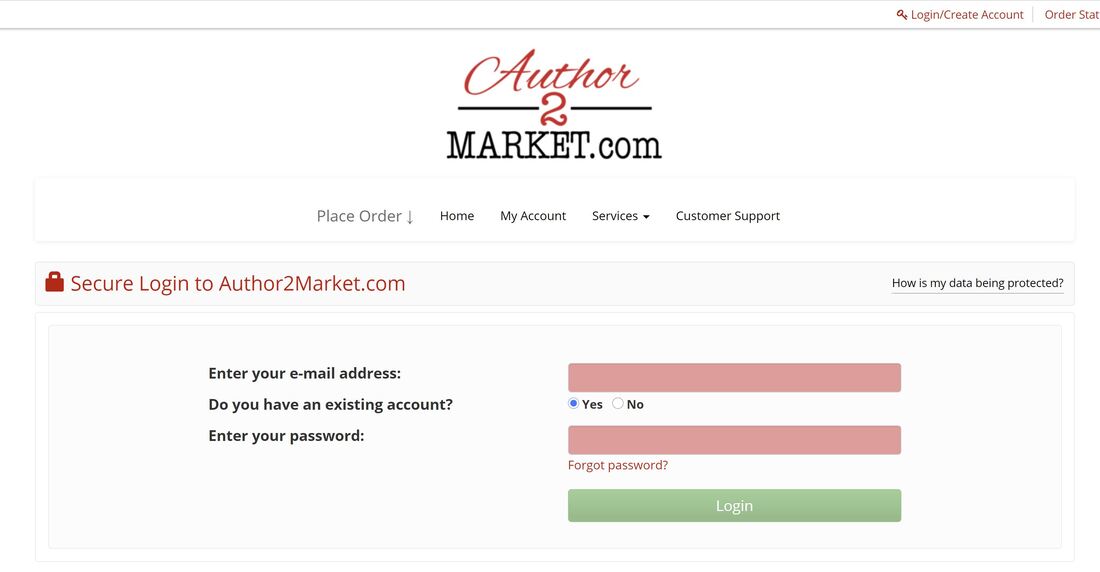
First, please make sure you are on the correct site. The login screen for the book side of Author2Market looks like the following:
Our promotional items site (business cards, banners, bookmarks, greeting cards, etc) login looks like this:
Books can only be ordered through the book portal.
If you are having difficulty remembering your password, please select Reset/Forgot Password on either site and follow the prompts to reset your password. For further help, please call us at 602-276-2964.
If you are having difficulty remembering your password, please select Reset/Forgot Password on either site and follow the prompts to reset your password. For further help, please call us at 602-276-2964.
Navigating your book portal
The book portal is comprised of a few different pages.
The My Account page allows you to edit your login info (email and password), as well as your account settings. In Account Settings you can setup your eCommerce info, your contact info in the case of problems, and your return info. This information will be used, if possible, to redirect packages to you if your customer's address is invalid. This address must be in the United States and cannot be a Post Office Box. Please be absolutely sure that this address is correct.
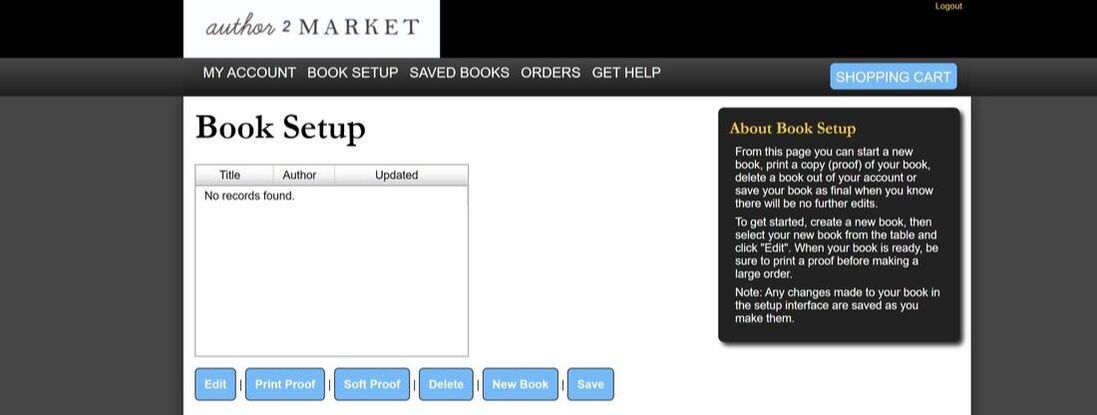
The Book Setup tab is where you will find your books. Here you are able to setup new books, edit existing books, order proofs, delete books, and save books to your saved books tab. For more information about setting up and editing books, please see farther down this page in the Book Setup section in this FAQ.
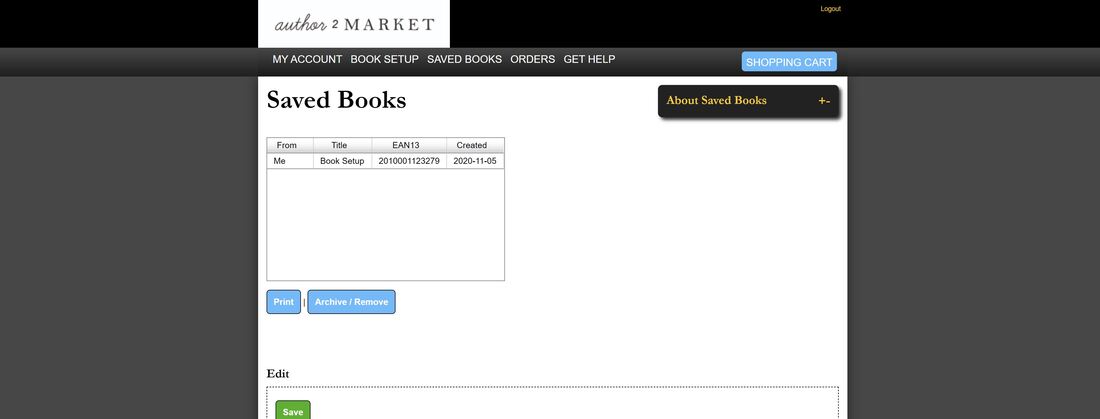
In the Saved Books tab you can order books, and edit the information of your book such as product ID, the product title, description, etc. Saved books are made from editable books in Book Setup. They can be connected to other organizations and to external sales systems.
Your Orders tab shows you both current and past orders. Select an order and hit the View Invoice button to view expanded information about that order.
Deleting my account
Deleting A2M accounts is uncommon. Most customers chose to set up new accounts with a different email and simply abandon old accounts. To inquire about deleting inactive or old accounts, please call us at 602-276-2964.
Book Setup
adding a new book
All changes are saved automatically.
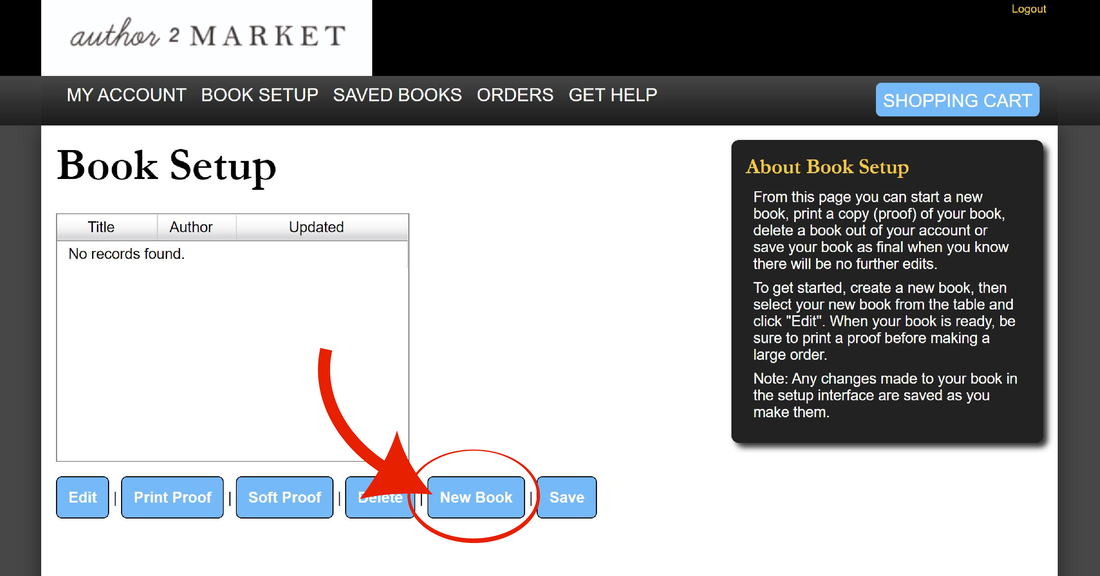
1. To set up a new book, first select the "New Book" button on the Book Setup page of your account.
1. To set up a new book, first select the "New Book" button on the Book Setup page of your account.
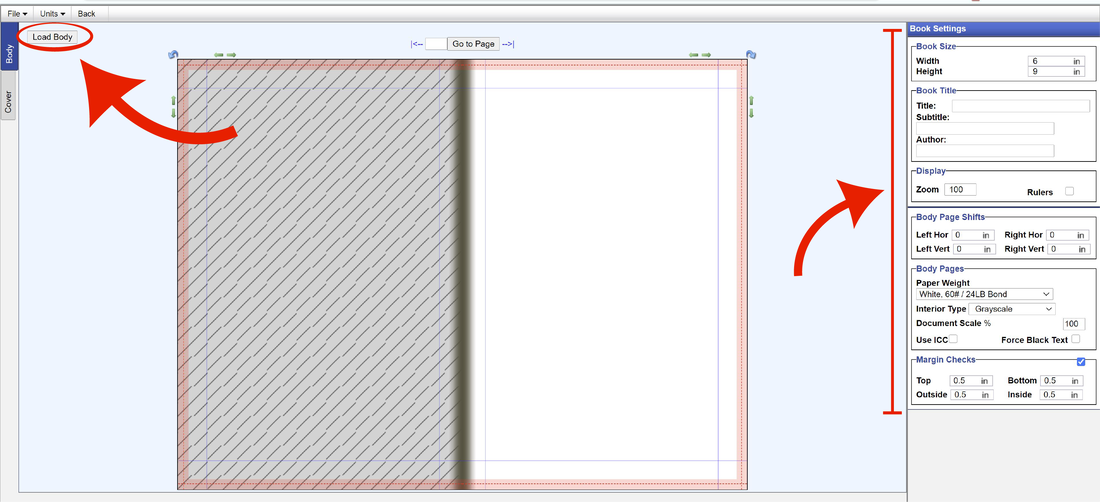
2. Fill in the info on the right panel, and select paper weight and interior type. Then upload* your body content by clicking the "Load Body" button in the upper left corner of the screen.
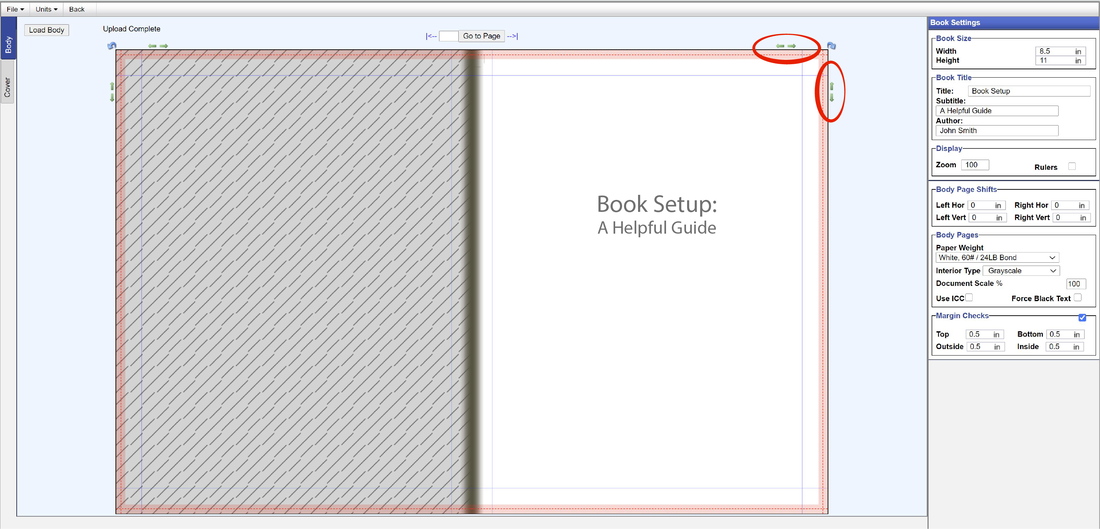
3. Adjust the position of your pages using the arrow buttons in the upper corners of the book preview, or by inputting your adjustments in the "Body Page Shifts" section in the right panel. These adjustments will affect all pages on that side adjusted. (e.g. adjusting the right page down by 0.125 in will adjust ALL right hand pages.)
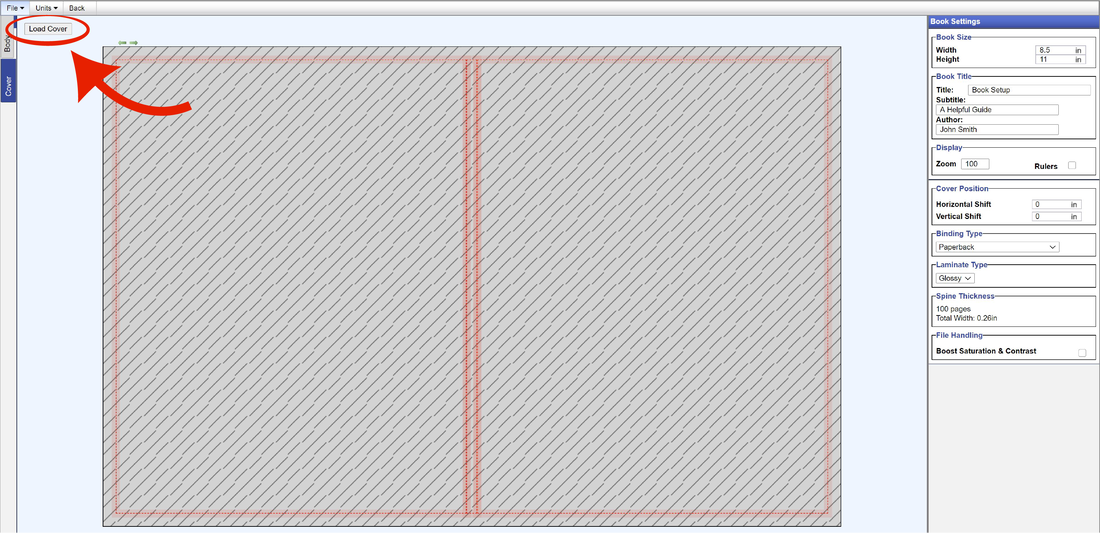
4. Upload* your cover by first selecting the cover tab on the far left, and then clicking "Load Cover".
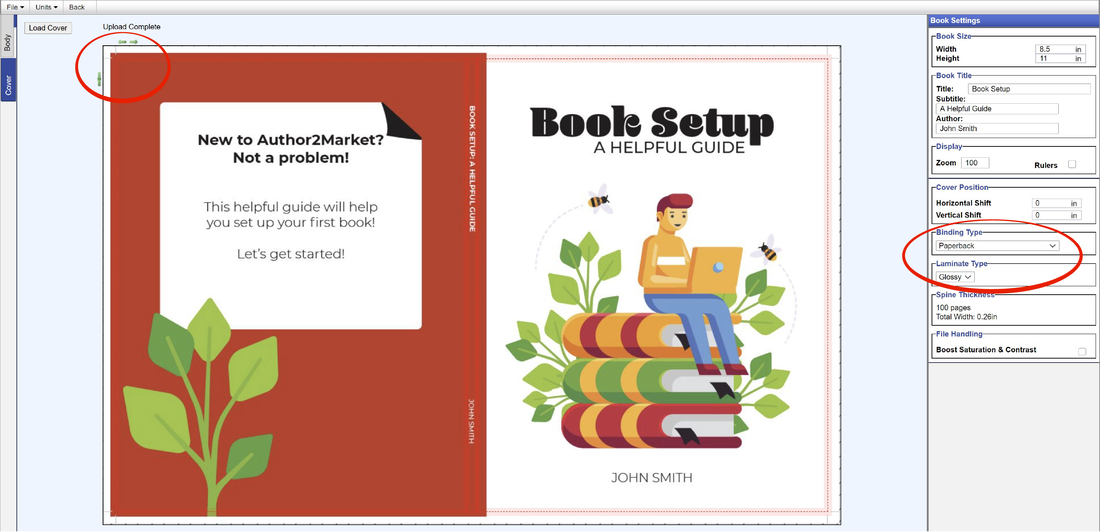
5. Adjust the position of your cover with the arrows provided. Select binding** and laminate type.
6. Once done, select "Back" in the upper left corner. All your changes will be saved automatically.
* Recommended file type for both cover and body files is PDF X-1A.
** Coil binding will cut out the spine design. We recommend you design your cover specifically for coil, instead of using the same cover or same method.
* Recommended file type for both cover and body files is PDF X-1A.
** Coil binding will cut out the spine design. We recommend you design your cover specifically for coil, instead of using the same cover or same method.
editing an existing book
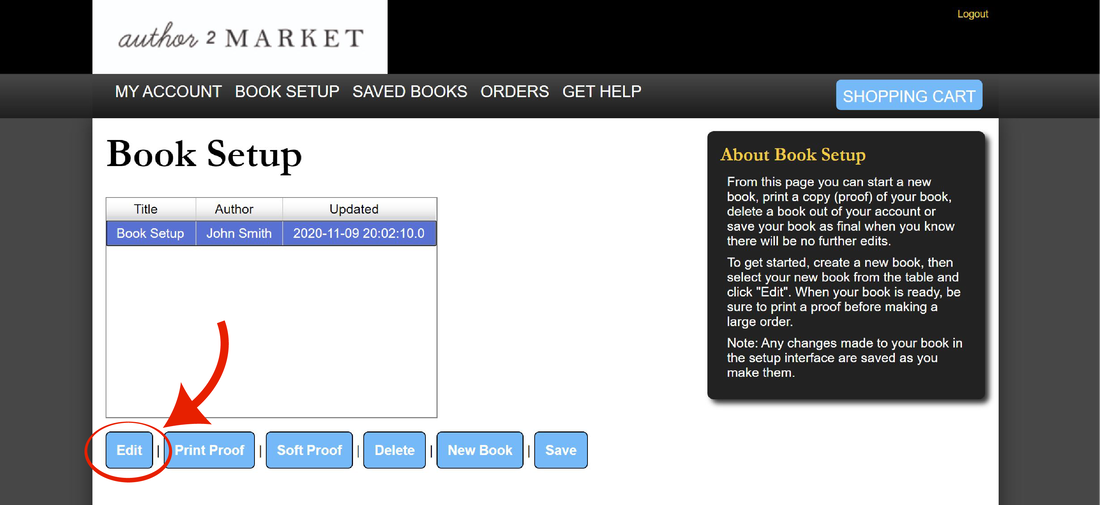
To edit an existing book, first select the book in your book setup, then click the "Edit" button highlighted below.
Once in the editor you may upload new files, adjust placement, change paper types, cover finishes, etc. All changes will be saved automatically. You may edit a book as many times as you want.
Select "Back" in the upper left corner to exit the editor and return to your account.
Select "Back" in the upper left corner to exit the editor and return to your account.
what are your cover, page, and binding options?
Cover options are gloss or matte. Gloss is our default.
Interior page options are white 60# (default), lightweight white 40#, or cream 60#.
Binding options are perfect (default) or coil. We do offer a saddle stitch option, however the product is different than our perfect bound books. Saddle stitch is magazine style, color and only has a self cover option. Self cover means that the same type of paper is used for the cover as is used for the interior pages. The file that is uploaded needs to be an x1a PDF that includes all pages including the cover and inside covers with the front cover first in the file and the back cover last in the file.
what sizes can you print?
Traditional book sizes are either 6 x 9 inches or 5.5 x 8.5 inches. However, we can print any size between 4 x 6 inches and 8.5 x 11 inches*.
*8.5x11 inch books only as a portrait orientation (binding on long edge). For an 8.5x11 inch book with a landscape orientation (binding on the short edge), please submit a request for a quote on our sister site D&L Press, Inc.
*8.5x11 inch books only as a portrait orientation (binding on long edge). For an 8.5x11 inch book with a landscape orientation (binding on the short edge), please submit a request for a quote on our sister site D&L Press, Inc.
Do you provide an isbn? Do i need one?
We do not provide ISBNs. An ISBN, International Standard Book Number, is a thirteen digit number unique to a published book. You can purchase your own ISBN at Bowker (if in the U.S.), or from ISBN-International (if outside of the U.S.). Please be aware that all purchases of ISBNs are final. ISBNs cannot be returned and are unique to that individual book.
You are not required to have an ISBN for ebooks or to self publish your book to distribute among family and friends. However, you must have an ISBN to sell printed books anywhere.
You are not required to have an ISBN for ebooks or to self publish your book to distribute among family and friends. However, you must have an ISBN to sell printed books anywhere.
my book has a color page or is an uncommon size
All covers are printed full color. Pages are either full grayscale or full color.
If you have a book with a single or set of color pages, or a book that is an uncommon size, please submit a request for a quote on our sister site D&L Press, Inc.
If you have a book with a single or set of color pages, or a book that is an uncommon size, please submit a request for a quote on our sister site D&L Press, Inc.
File Prep
what file format should my book and cover be
For both the cover and interior, we prefer PDF X-1A. Regular PDF is also accepted, but for better color accuracy we recommend making sure your files are CMYK instead of RGB. Files should also be to the correct size of your book.
setting up your cover File
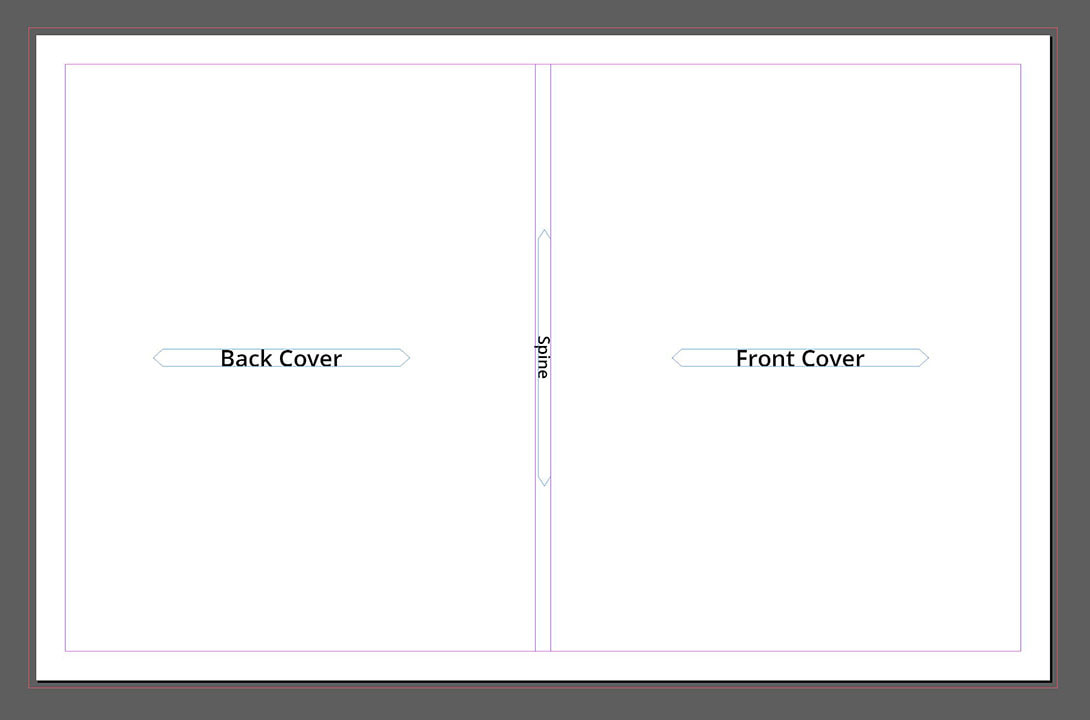
Your cover MUST BE all in one file. That means your front cover, back cover, and spine must be combined together similar to the following. The next few steps will help you properly create or layout your cover.
1. Find your spine width via our calculator, or by uploading your interior file to the book setup and then checking Spine Thickness in the right info panel under the Cover tab.
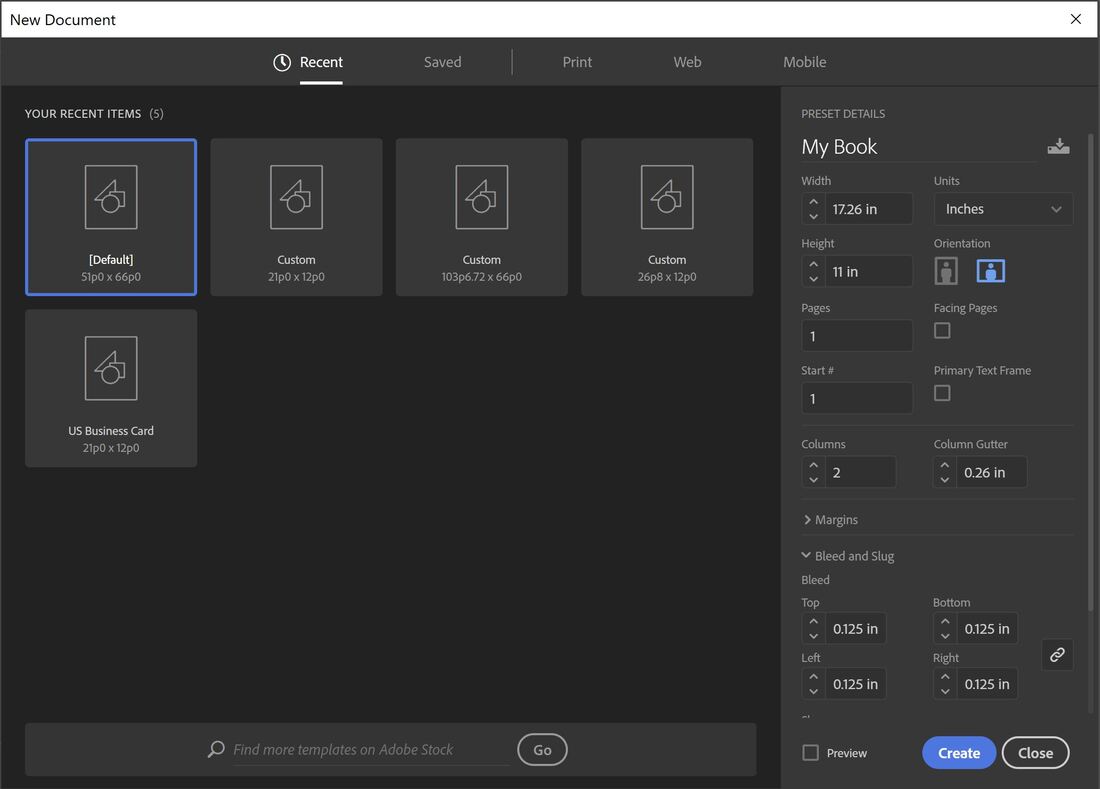
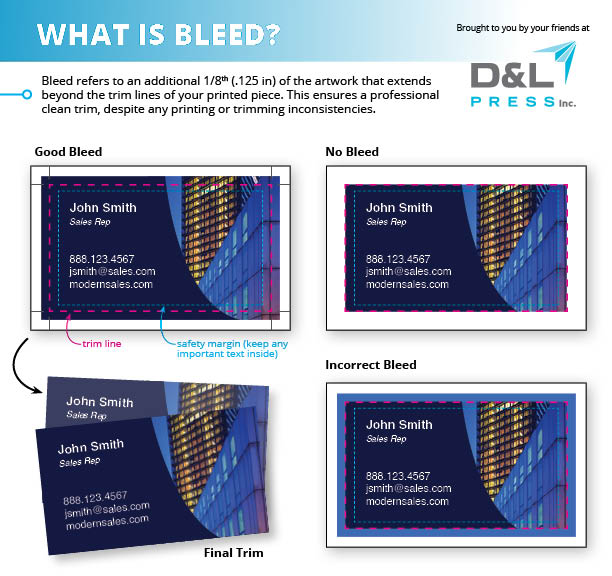
2. (Demonstration using Adobe Indesign CC, your program may differ) When creating your cover file, add together the back cover, front cover, and spine width for your full width. A bleed of at least an 0.125 inch or greater is highly recommended to avoid strips of white on the edges of your cover or internal pages. (Bleed is artwork that extends off the actual dimensions of the document.) A favorite shortcut from our designer for setting up your spine easily, is selecting 2 columns and then inputting your spine width as the column gutter.
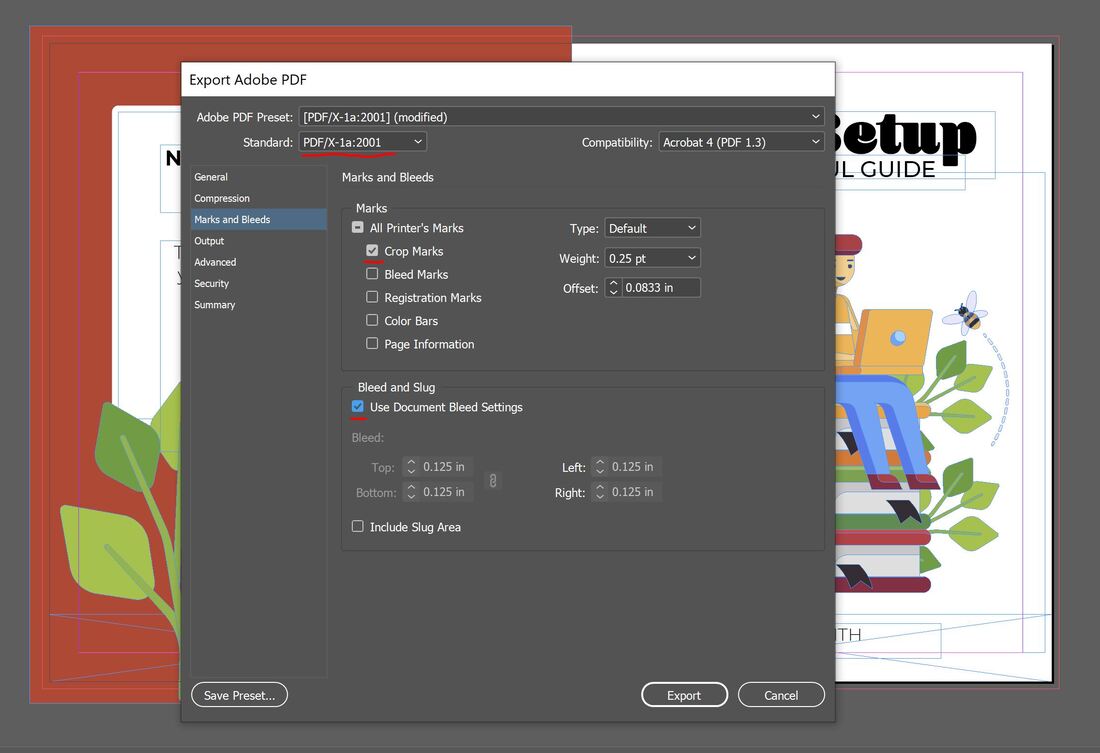
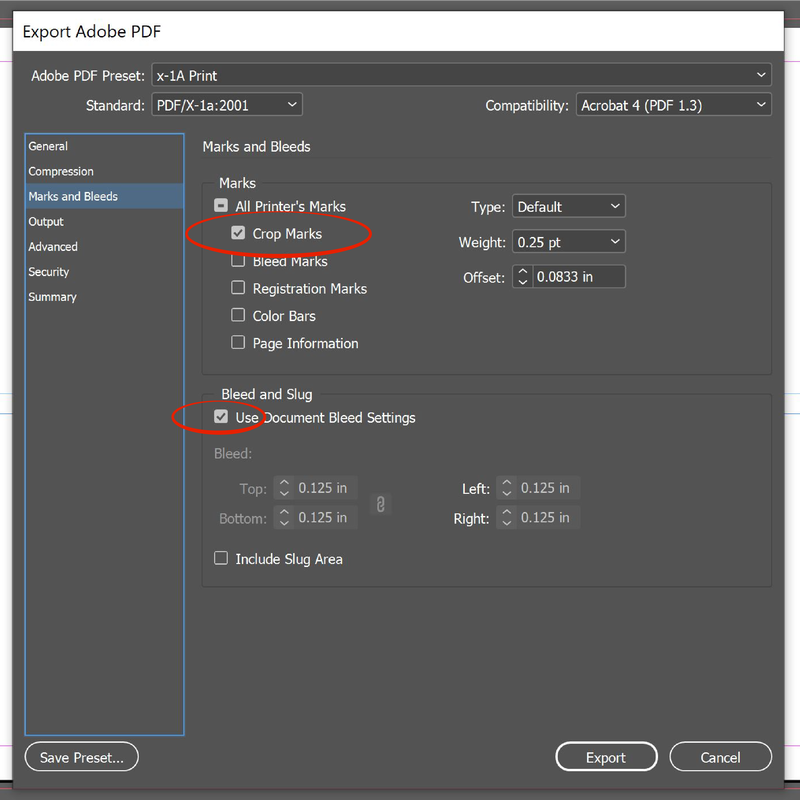
3. Design your cover as desired, and then export as PDF X-1A with bleed. Crop marks are not necessary but are ok.
setting up your interior pages File
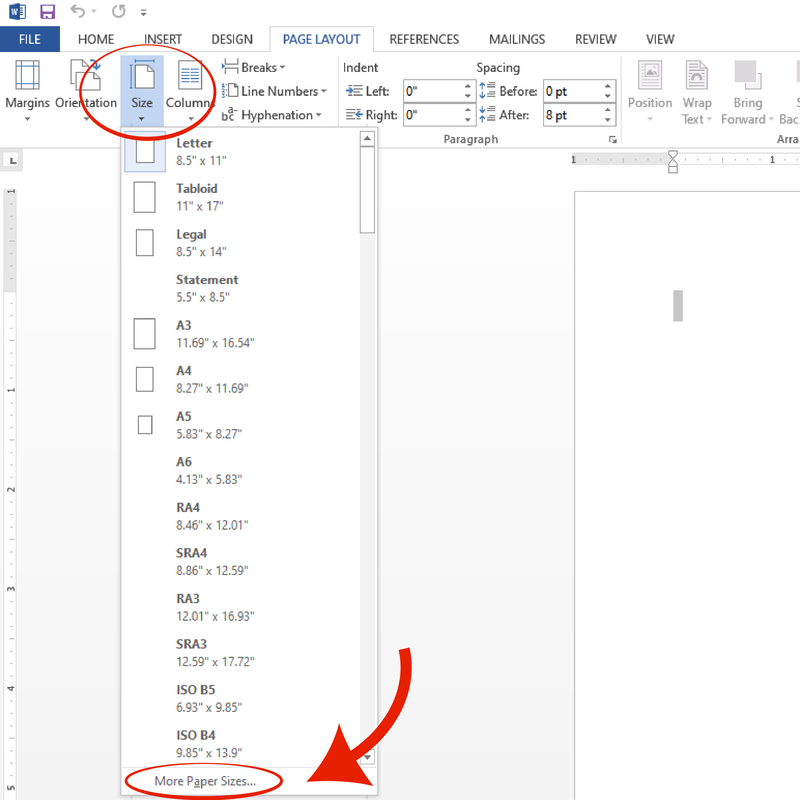
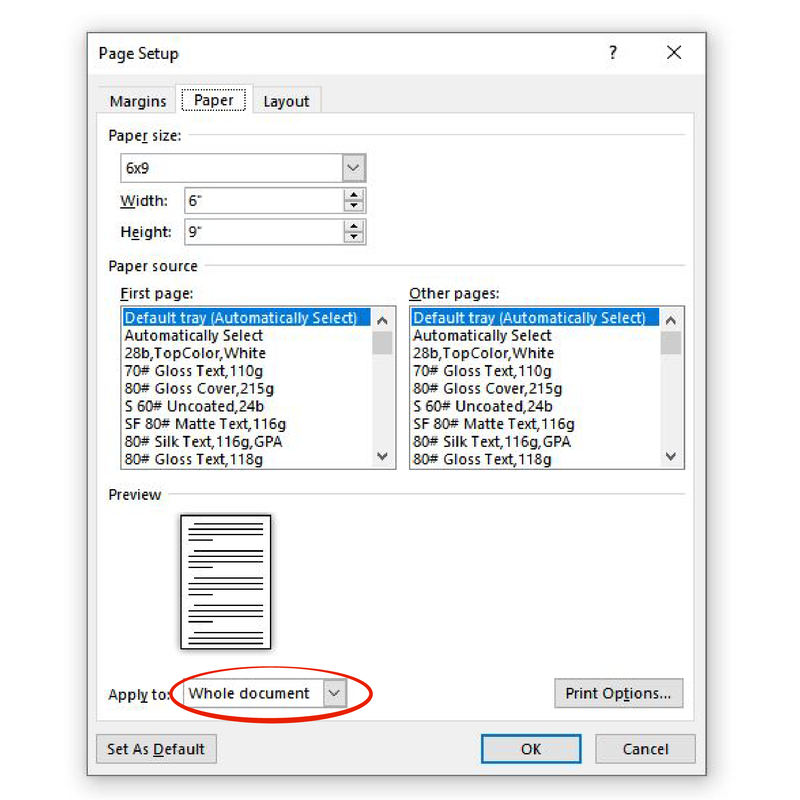
Your interior file should be single pages, not spreads, and to the size of your completed book. (e.g. pages created as letter size 8.5x11 inches in Microsoft word will not automatically reformat when uploaded to a 6x9 inch book. The file must be created as 6x9 inch.)
For Microsoft Word users:
See the following images for how to set up a custom sized Word document.
For Microsoft Word users:
See the following images for how to set up a custom sized Word document.
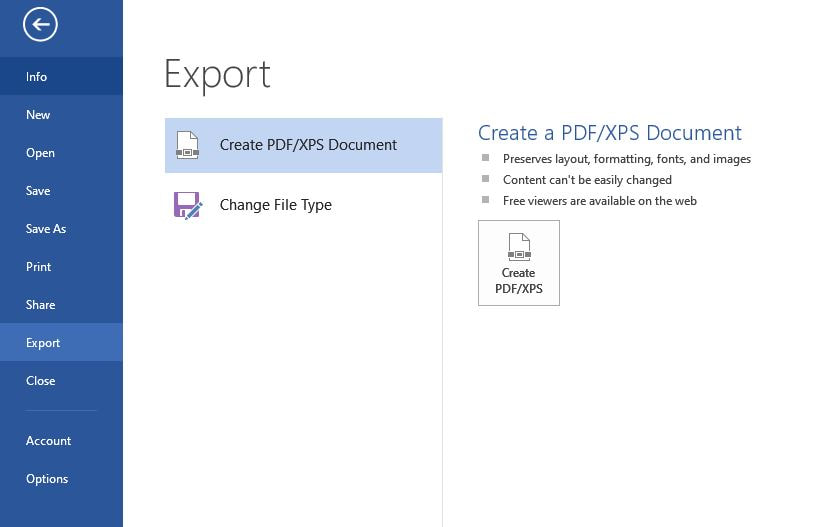
Export your word document as a PDF in the Export option found in FILE tab.
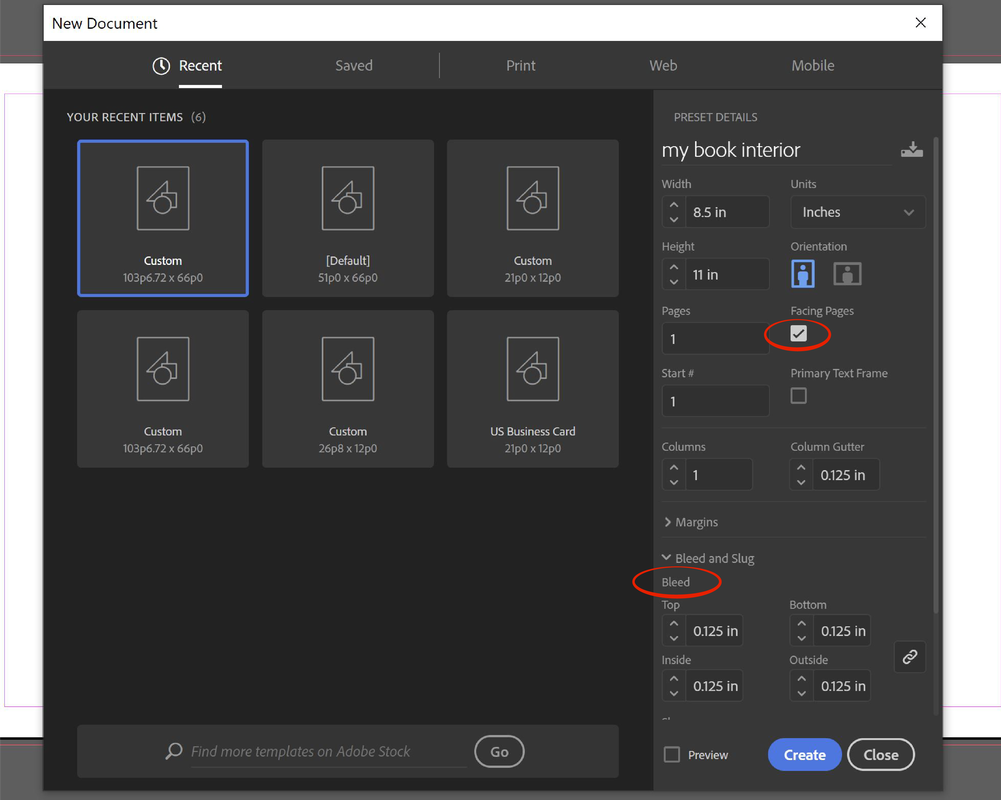
For Adobe Indesign users:
If setting up with Indesign, make sure to select facing pages and input at least a 0.125 inch bleed.
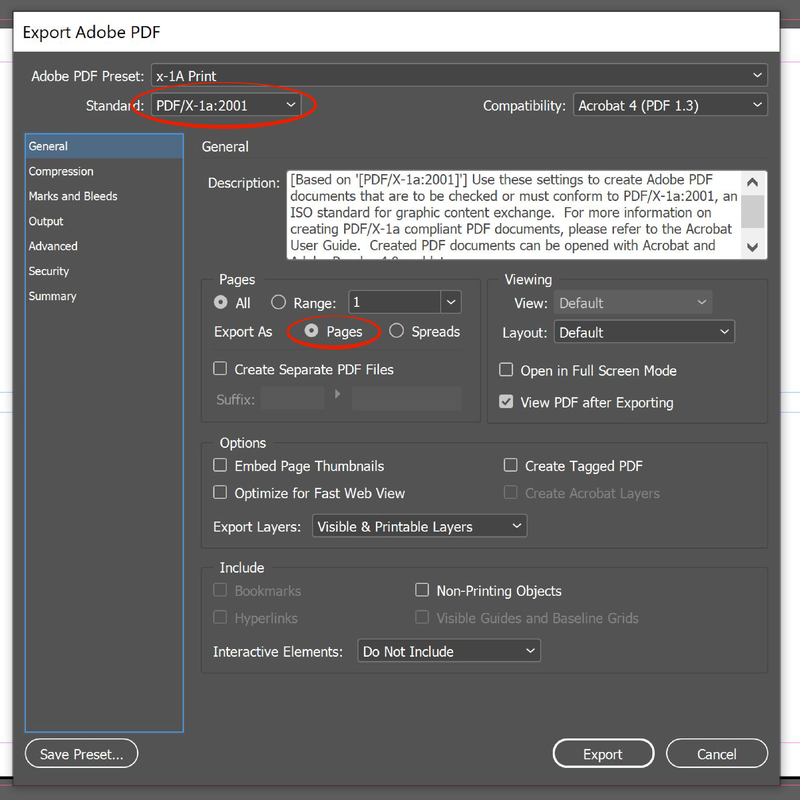
Export your file as a PDF/X-1a, with crop marks, and bleed included.
PDF to PDF X-1a format Conversion
We highly recommend using the x-1a (sometimes called x-1a:2001) format for PDFs uploaded into our system. The x-1a format is available primarily through Adobe Creative Suite products such as InDesign or Acrobat Professional.We can utilize PDFs created through Word or free PDF creators, but these do not always create usable PDFs for professional printing. If there is a problem with processing your file or if the results of printing are not as you desire (font problems, contrast in text, poor interior picture quality, etc...), the most effective easy fix is to create new PDFs in the x-1a format and reupload into your account.
If you are using Adobe Acrobat Professional, you can convert your PDF files to x-1a files using the following steps:
1) Select the tools bar.
2) Locate the Print and production tab, expand it and open Preflight.
3) Once Preflight has been opened, select tab "PDF/X Compliance"
4) Select "Convert to PDF/X-1a (SWOP)"
5) Press the "Analyze and Fix" button.
6) Save As with a different name and use the new file to upload to your account.
If this is not successful, an alternative is to use Acrobat Distiller using the following: :
1) Open the PDF in Adobe Acrobat Profesional
2) Go to File-Print and select Adobe PDF as the printer
3) Click the Properties button next to the Select Printer box
4) In the Standards drop-down box, select PDF x-1a 2001
5) Click the Print button and save the file with a different name.
6) Upload the new PDF to your Author2Market account
Ordering
Why should i order a proof?
When your book is ready, be sure to print a proof before making a large order. Printing a hard copy proof will allow you to check colors, page placement, and size.
what is a soft proof?
A soft proof is a digital proof sent via email within 24 hours for a flat fee of $5. Although offered, we do not recommend ordering a soft proof, unless you do not have the time to order a hard copy proof. This is because you will be unable to check real color or sizes as you would with a hard copy proof.
Do you offer inplant pickup?
We do offer in-plant pickup for loyal customers in Phoenix, Arizona. To request your account be set up for in-plant pickup, please call us at 602-276-2964.
Please have your order ID number, book title, and quantity ready when you arrive for pickup.
Please have your order ID number, book title, and quantity ready when you arrive for pickup.
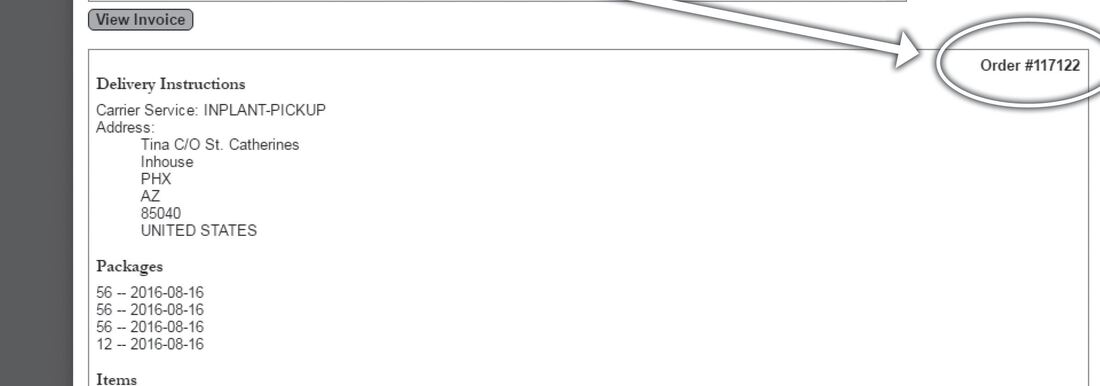
Where do i find my order number?
How to place an order
To order a proof, select the book in your Book Setup tab, then click Print Proof in the blue menu options. Or from the Save Books tab, select your book and click Print. Then select your shopping cart button in the upper right corner and proceed through checkout.
|
Need some additional guidance in using the A2M website or ordering your best seller?
Download our full user guide to help you through the process |
FULL User Guide
| ||||||

